Shakuhachi Note Charts
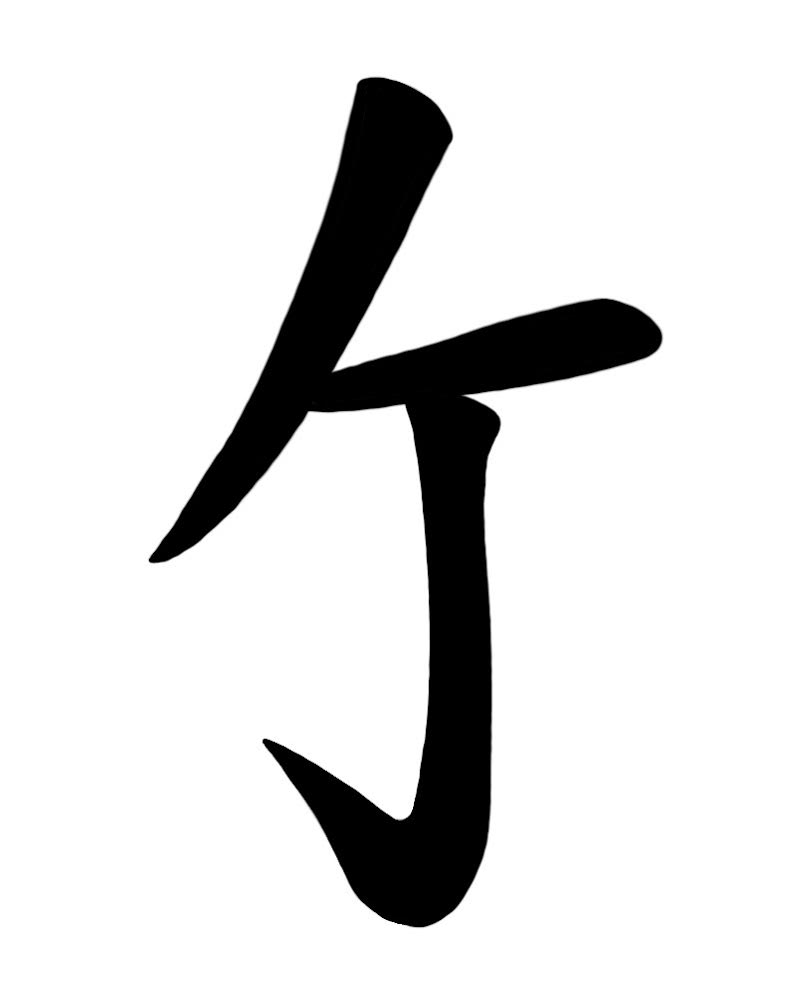
For my shakuhachi note charts, the Katakana ハ ‘Ha’ is used. Alternatively, this note is represented by り ‘Ri’ in Kinko Ryu notation systems. ハ was originally used for the Honkyoku of the Seien Ryu from Fudaiji Temple.
Another tiny bit of info, all shakuhachi notation is what’s known as phonetic musical notation, as it’s based on the Katakana syllabary. It’s preferable to staff notation for nearly all shakuhachi pieces. Perhaps unsurprisingly, most people find shakuhachi Katakana notation to be far more intuitive than Staff.
How to read my shakuhachi note charts
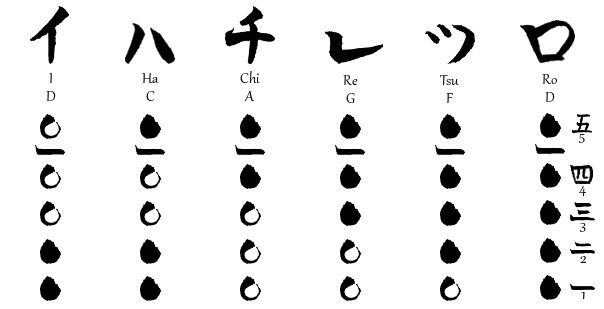
Like most shakuhachi notation, you’ll read my shakuhachi note charts from right to left and top to bottom.
- To the far right are Japanese numbers 1-5, each hole having a designated number. Hole 1 is furthest from your face and covered by the bottom hand ring finger.
- A black circle represents a closed finger-hole (ロ has all holes closed).
- An enso ‘ring’ is an open finger-hole.
- The thumb-hole, found on the back of the shakuhachi, is the topmost circle in the chart or #5/五 ‘go’ (the small dash ‘—’ separates the front four finger-holes from the rear thumb-hole).
- For ハ ‘Ha’ and イ ‘I’, cover the bottom two finger-holes (some shakuhachi might work best by just covering hole 1)
The shakuhachi has two full registers and some third register notes. In Japanese, we call the first register Otsu 乙 and the second register Kan 甲. The first sound you get will most likely be in Otsu because Kan requires more air pressure or effort to achieve (video on Kan here).
Notice that you’ll play ハ ‘Ha’ and イ ‘I’ by covering the bottom two finger-holes. We do this because it helps to produce a more solid tone for these two notes. Note that some shakuhachi prefer only hole one to be covered for these two notes, especially in Kan (some even prefer all holes open). You may have to experiment with this for you flute(s).
When going from ハ to チ ‘Chi’, notice that your bottom two fingers must lift off for チ. With practice, this transition between チ and ハ will become second nature. Strive for a smooth, clean transition between チ and ハ.
Every note on the shakuhachi has a different range of power and volume. Some notes are also more difficult than others. For practicing and exploring Otsu, チ, ハ, and イ tend to be or should be expansive, offering room to explore. ロ on well made shakuhachi is expansive, however, it tends to be the most difficult note to perfect, requiring a larger opening of the lips which does not work well for most other notes, especially the higher register Kan.
How to Articulate a Note Using an Atari
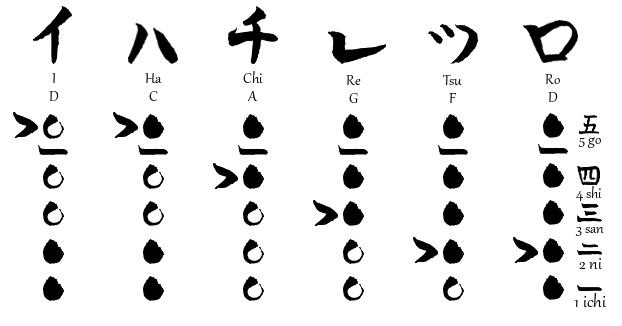
レ can also be repeated on hole 四/#4. In some notations, repeats are alternatively notated by simply writing the note again.
How to read my Atari shakuhachi note chart
- For my atari shakuhachi note chart, the hole to ‘repeat’ on has the traditional ‘>’ symbol to the left of it. To atari, quickly open and close the designated hole in a quick, ‘popping’ manner.
- Repeating イ is accomplished by tapping the open thumb-hole.
- Many flutes make use of tonguing to ‘articulate’, ‘attack’, or ‘repeat’ a note, however, traditional shakuhachi uses the fingers. Many people call this technique atari 当たり or ‘striking’ and sometimes osu 押す or ‘pushing/pressing’. By using our fingers to articulate a note instead of our tongue, we shakuhachi players leave our air stream undisturbed, which has some advantages.
Meri Shakuhachi Note Chart
(One can easily come across a lot of differing opinions on pitch for the Meri notes. For an essay on this topic see the guide titled, Shakuhachi Meri Note Pitch.)
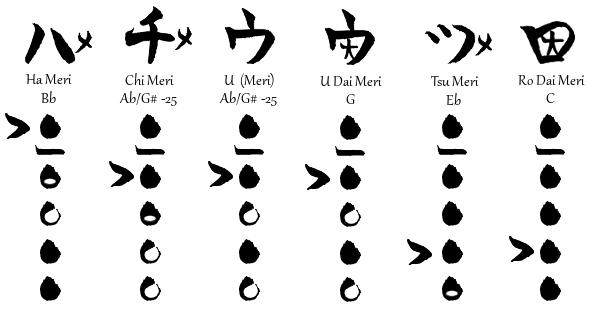
How to read my meri shakuhachi note chart
Tip: Before your first lessons be sure to practice ウ ‘U’. Once you have the finger position down for ウ, practice going back and forth between ウ and the notes レ ‘Re’ and ハ ‘Ha’.
- Meri notes usually have メ ‘me’ written next to them (the old Seien Ryu notation we’ll use in your lessons doesn’t makr Meri notes). They’re notes in which we flatten the pitch and lower the volume for a ‘dark’ sound. ウ ‘U’ is always meri and thus doesn’t require the メ. For ロ, the 大 ‘dai’ symbol inside of ロ indicates ‘great’ or ‘big’ meri.
- ツメ, チメ, and ハメ require ‘finger-shading’, indicated by the mostly blacked out enso ‘◓’ (see image below – I’ll need to help you with the exact particulars of this in lessons).
- Meri is primarily achieved by getting the lips closer to the blowing edge, typically by lowering our head which covers up more of the top opening.
- Meri notes also require less air pressure than regular notes so don’t squeeze with the Hara or ‘abdomen’ nearly as much.
- It’s often best to practice lowering the head separately from finger-shading at first. Once you’re more comfortable with these two techniques you can try to put them both together.
- It’s essential that our bottom hand doesn’t move out and away from us when we lower our head. Additionally, we shouldn’t lift or lower the shakuhachi with our arms.
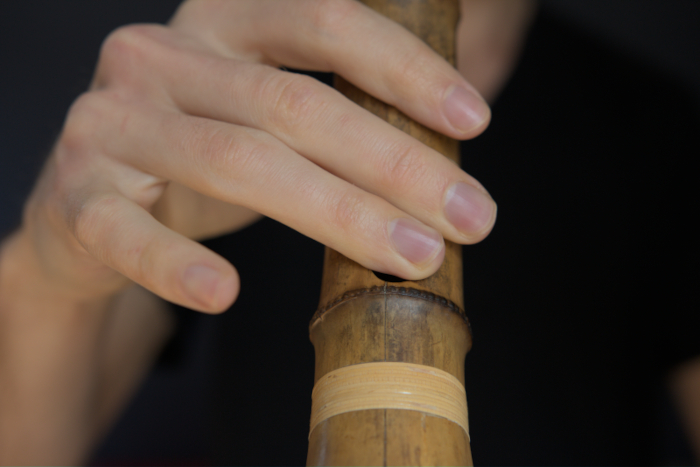
For meri we can also use our lips to get closer to the edge in addition to or instead of the head. However, use of the lips for meri is more advanced/difficult so it’s usually best to begin by tilting the head. In the beginning, you will not be able to flatten the pitch very much. Meri is the most difficult technique to master. The shakuhachi is indeed an instrument of great subtlety.
Once you’re familiar with these shakuhachi note charts you can proceed to Your First Honkyoku: Kyorei 虚鈴.
